My team within Autodesk experimented with a concept that is called Fedex-day, which translated as a one day project that absolutely without exception had to happen in 24 hours and be completed. The team all did this on the same day. We unplugged from our normal daily routine, were not allowed to schedule any meetings or calls, turned off our email and hid our phones. Our task was to come up with a one day project, that at we could execute within 24 hours, then document it and report out to our team the next morning. It could be any topic, but it had to result in something. You could not use it as an excuse to sleep all day.
We had team members who did videos, one that wrote a short story, one that created a database of worldwide relationships, and others that created new ways of engagement for the team. My project became the kickoff of my dream. I had been wondering about how to execute the burr puzzle cabin, and always realized the most critical step was the execution of the corner. The corner is a six-piece burr that is replicated 8 times to form the main frame of the cabin. It is the first key and arguably the most complex of the joints. If I could create this joint, then I could create the cabin. So my Project for FEDEX day was born.
I had already determined at the most practical working size for the frame were 6x6s mainly because of the weight of a 16 foot long timber which was the most practical and readily available size to use for the first cabin. An 8x8 of the same length was simply to heavy to handle, and probably overkill. So I picked up a few 6x6 wood posts which is the only material needed and pondered the process.
There are two fundamental cuts in any notchable burr. One is a notch the width of the "post" by half its width and the other is half its width by half its width. That is to say in this case 5.5 by 2.75 inches and 2.75 by 2.75 inches since a nominal 6x6 is actually 5.5 inches. With this combination all the notch combinations can be made.
On a small puzzle this can be done with repeated cuts on a table saw, a dado blade or a router. On a larger scale, the typical method for timber appeared to be to cut relief cuts the width of the final notch and then chisel the remainder of the notch to clean it. Therefore I needed a saw that could cut 2.75 inches deep. I could not bring myself to use a hand saw unless it was the last resort. I needed a 10 inch circular saw. A task easy to find at the contractor rental stores. Well easier said than done. I called everyone, and no where in my area was anything like this available to rent. So I looked for local stores to buy one, and that was a lost cause also. No one could get me one in time for Fedex-day. The hand saw was looking better at this point.
But alas, after moaning about how strangely hard it was to find a saw, my brother discovered a friend of his that had a 12 inch circular saw. My backbreaking work with a handsaw was avoided, but then the beast showed up. It was huge. The biggest saw I have ever seen. (Even though now have a 16 inch saw, but that is a different blog post.) The saw was the key, and Fedex-day day arrived, with me ready to go.
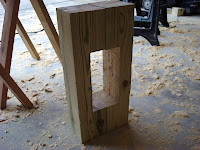
I think there is no need to write about the process since I can show you it all in pictures. I placed them in order below and you can follow the details picture by picture.
 |
| My Conversation Starter On My Front Porch |
The result was a big puzzle, but the key to a bigger process. It stood on my front porch for a while, then my back deck and now that I have a model shop, it is the first thing you see as you ascend the stairs. I knew that this trial run would teach me some valuable lessons, so here they are:
- The accuracy of the depth of the cuts was critical, and this large saw was not designed to have good control over the depth. It was hard to adjust and slipped over time.
- A big chisel is needed. A 2.5 inch one would be ideal. Even bigger would work best in the wide notches.
- The routing of the 45 degree chamfer cleaned up the world of sins, and uneven depth of cuts.
- Getting the saw aligned and stable was critical. In the end, even after the modification of the Krebs guide to make it as long as possible, it was too small to guide the saw.
- Creating a layout jig will be helpful when doing multiple cuts in the future.


